
By Rory Hale – REALTOR®, Rural Properties & Acreages near Calgary
I remember when I first bought my property and struggled with spotty cell service and no internet. Thankfully, technology has come a long way since then!
Not too long ago, while showing a property, my clients were ready to walk away because they couldn’t get a cell signal. But once I mentioned that internet access can easily solve that problem, I realized that many people don't know about the great solutions for improving phone service on their properties.
With innovations like Starlink https://www.starlink.com/, and simple products found on Amazon like outdoor internet boosters (TP-Link EAP225-Outdoor), and Power over Ethernet (PoE) switch (TP-Link 8 Port Gigabit PoE Switch), outdoor direct bury ethernet cable (getting connected has become much easier and more affordable. I went from needing a cell booster to make a call in just one spot in my house to chatting on my phone while wandering around my 20-acre pasture! Here is a quick overview of the setup that I used.
Here are clear, step-by-step instructions to help you connect your Starlink internet service to a PoE (Power-over-Ethernet) hub and an outdoor PoE Wi-Fi booster to extend your internet range on a rural property:
🛰️ Step 1: Set Up Your Starlink System
Install your Starlink dish outdoors in a clear, unobstructed location.
Run the Starlink cable into your home and connect it to your Starlink Router.
Note: If your Starlink system uses an Ethernet adapter (such as newer Starlink Standard or Starlink Ethernet Adapter), ensure it’s connected correctly to your Starlink router.
🌐 Step 2: Connect the Starlink Router to a PoE Hub (Switch)
Use an Ethernet cable (Cat5e or Cat6 recommended) to connect from your Starlink router’s Ethernet adapter or Ethernet port directly into one of the regular (non-PoE) ports labeled "Uplink," "WAN," or simply an available port on your PoE Ethernet Hub/Switch.
PoE Switch:
Affordable option:
⚡ Step 3: Connecting the Outdoor PoE Wi-Fi Booster
Use a long, weatherproof Ethernet cable ( outdoor direct bury ethernet cable Cat7 recommended for best performance) to connect your outdoor PoE Wi-Fi booster/access point.
Connect one end of this Ethernet cable into one of the PoE-enabled ports on your PoE switch.
Run the cable outside to the location where you want to mount your Wi-Fi booster. Ideally, position this device in a central and elevated outdoor area to ensure optimal Wi-Fi coverage.
📡 Step 4: Mounting the Outdoor PoE Wi-Fi Booster
Securely mount your outdoor PoE Wi-Fi booster on a pole, wall, or structure using included mounting brackets or hardware.
Ideal outdoor Wi-Fi boosters include:TP-Link EAP225-Outdoor (affordable, reliable)
Ubiquiti UniFi AC Mesh (higher-end performance)
Connect the Ethernet cable securely to the device’s PoE input port. Ensure the waterproof seal or gasket provided is tightly fitted around the Ethernet cable connection.
🔌 Step 5: Powering Up and Testing
Plug in your PoE Ethernet hub/switch to a power outlet. This powers your outdoor booster through the Ethernet cable.
Confirm power by checking the LED indicators on the PoE switch and the outdoor Wi-Fi booster.
📶 Step 6: Wi-Fi Configuration
Connect to the outdoor Wi-Fi booster’s default wireless network (check your device manual for SSID and password).
Access the Wi-Fi booster configuration page using the provided IP address from the device’s manual.
Configure the Wi-Fi booster to:
Create a new SSID (network name) clearly distinguishable (e.g., “Property_Extender”).
Set a strong password for security.
Ensure the booster operates in Access Point (AP) mode for best results.
✅ Step 7: Verify and Optimize
Walk around your property to verify Wi-Fi coverage.
Adjust the placement or height of your outdoor booster for optimal coverage.
📌 Connection Diagram for Quick Reference:
Starlink Dish
    │
    │ Starlink Proprietary Cable
    │
Starlink Router (or Ethernet Adapter)
    │
    │ Ethernet Cable (Cat5e/Cat6)
    │
PoE Ethernet Hub/Switch (Inside Home)
    ├───────────────┐
    │               │ PoE Ethernet Cable (Outdoor-rated)
  Other          Outdoor PoE Wi-Fi Booster
Wired Devices           │
                        │ Wi-Fi Signal
                  Outdoor Wireless Devices
                  (Phones, Cameras, etc.)
⚠️ Important Considerations:
Always use outdoor-rated Ethernet cable for external installation.
Proper grounding and weather sealing are essential for outdoor equipment.
Regularly check firmware updates on your Starlink router, PoE switch, and Wi-Fi booster to ensure reliability and security.
Of course, all is great, but you still need to enable wifi calling, then like me, you’ll be able to roam your acreage and still stream your favourite music, and not miss a call just cause you're out by your garden.
Here is a guide on enabling Wi-Fi calling on iPhones and Android devices, along with alternative solutions for areas with limited or no cellular service. Remember, you need to have cell service when you enable this.
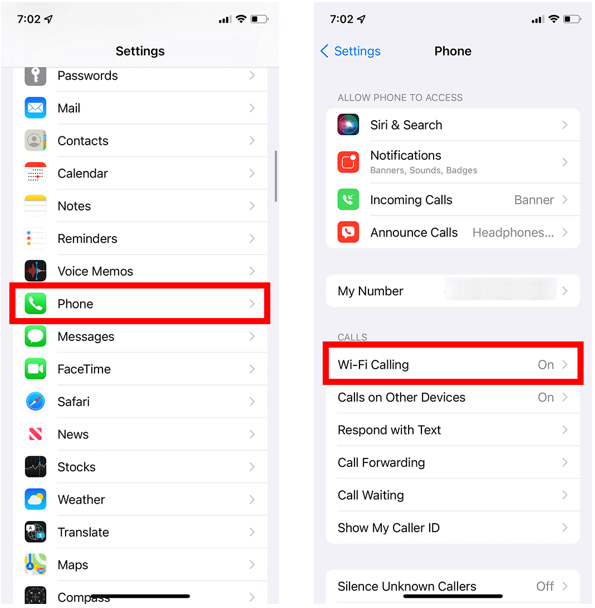
📱 How to Enable Wi-Fi Calling
iPhone
Open Settings.
Tap Cellular (or Mobile Data).
Select Wi-Fi Calling.
Toggle on Wi-Fi Calling on This iPhone.
Enter or confirm your emergency address for 911 services.(Samsung, Apple Support, Apple Support)
For more details, refer to Apple's official guide: (Apple Support)
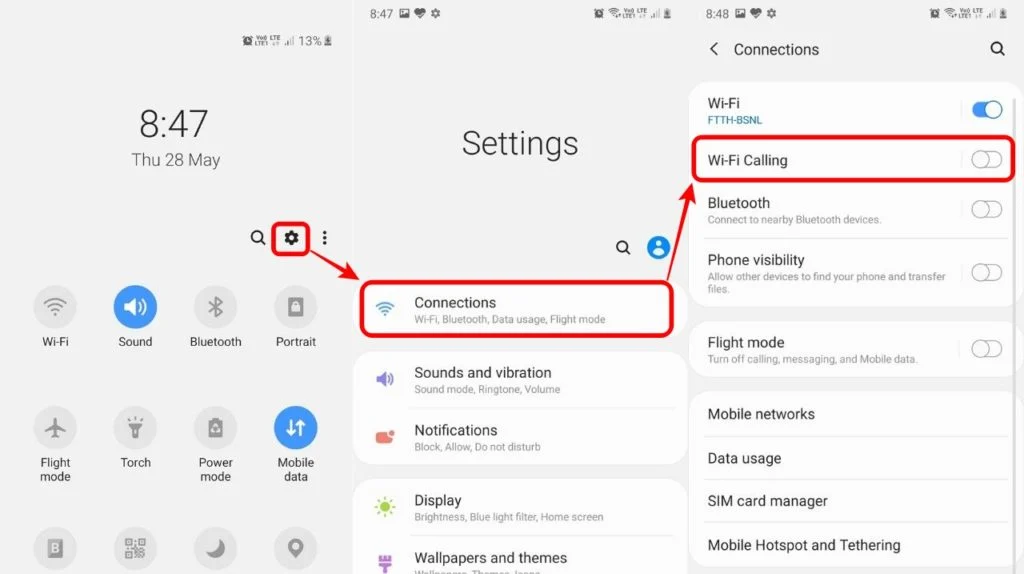
Android
Samsung Galaxy
Open Settings.
Tap Connections.
Select Wi-Fi Calling.
Toggle the switch to turn it on.
Enter emergency address information if prompted.(Samsung, Reddit, Verizon, Apple Support)
For more information, visit Samsung's support page: (Samsung)(Samsung Community)
Google Pixel
Open Settings.
Tap Network & Internet.
Select SIMs.
Choose your SIM and tap Wi-Fi Calling.
Toggle on Use Wi-Fi Calling.(Samsung, Verizon, Lifewire, Apple Support)
Detailed instructions are available on Google's support page: (Google Help)(Google Help)
✅ Pros and ❌ Cons of Wi-Fi Calling for Rural Acreage Internet Service
Pros
Improved Coverage: Make and receive calls where cellular signals are weak or unavailable.
Cost-Effective: Utilizes your existing internet connection, potentially reducing reliance on additional hardware.
Enhanced Call Quality: Stable Wi-Fi can offer clearer calls compared to weak cellular signals.
Battery Efficiency: Reduces battery drain from searching for cellular networks.(Lifewire, Reddit)
Cons
Internet Dependency: Requires a stable and sufficient internet connection.
Bandwidth Competition: Other internet activities (e.g., streaming, gaming) can affect call quality.
Emergency Services Limitations: Emergency calls may not provide accurate location data.
Device Compatibility: Not all devices or carriers support Wi-Fi calling.(Google Help)
📡 Alternative Options for Cell Service in Rural Areas
1. Cell Signal Boosters
Description: Amplify existing weak cellular signals to improve coverage.
Recommended Products:
weBoost Home MultiRoom: Suitable for medium-sized homes.
SureCall Fusion4Home: Ideal for areas with extremely weak signals.
Setup Instructions:
Install an external antenna where the signal is strongest.
Connect to an indoor amplifier and internal antenna.
Power on and test signal strength.(AT&T Business, Signal Boosters, ZOLEO, YouTube)
For more information, visit weBoost's website: (weboost.com)(weboost.com)

2. Femtocells or Microcells
Description: Small devices that create a localized cellular signal using your internet connection.
Availability in Alberta: Limited; many Canadian carriers have phased out support in favor of Wi-Fi calling.
Pros:
Provides a dedicated cellular signal.
Cons:
Requires specific carrier support.
May not be compatible with all devices.(Time, Apple Support, Reddit)
3. Satellite Communication Devices
Description: Enable communication via satellite networks, bypassing traditional cellular infrastructure.
Use-Cases: Ideal for remote areas without cellular coverage.
Recommended Products:
Garmin inReach Mini 2: Offers two-way messaging and SOS features.
ZOLEO Satellite Communicator: Provides messaging and weather updates.
Activation Instructions:
Purchase a device and select a subscription plan.
Register and activate the device online.
Install the companion app on your smartphone.(GearLab)
For a comparison between devices, see this guide: (Adventure Alan)
4. VoIP Services
Description: Use internet-based applications to make voice and video calls.
Suitable Conditions: Requires a stable internet connection; ideal when cellular service is unavailable.
Popular Services:
Skype
Google Voice
WhatsApp
Setup Instructions:
Download and install the application.
Create an account and verify your phone number.
Grant necessary permissions for microphone and contacts.(Nextiva)
For a list of VoIP services, refer to this resource: (GetVoIP)
📊 Summary Comparison Table
Living rurally in Alberta is uniquely rewarding, offering unmatched peace, natural beauty, and freedom—but connectivity can sometimes be a challenge. With the right setup, like connecting Starlink internet to a PoE-powered outdoor Wi-Fi booster, you can fully enjoy your acreage without compromising internet performance.
As a local rural realtor, I don't just help you find your dream acreage; I help solve challenges that come with rural living. Whether it's navigating connectivity solutions or finding that perfect property nestled in Alberta’s foothills, I'm here to support you every step of the way.
Ready to find your perfect acreage or need assistance optimizing your rural lifestyle? Reach out today—I’d love to help!
Disclaimer: Some of the links on this page are affiliate links. This means that if you click on a link and purchase the item, I may receive a small commission at no extra cost to you. As an Amazon Associate, I earn from qualifying purchases. I only recommend products that I believe are helpful and reliable.
